From Zero To Riff: How To Start Playing The Guitar Today
You’ve got the guitar and made the decision to play, that’s the hardest part! Now, let’s get straight to the action. Here, I’m going to guide you from where to start your guitar journey from practicing in your room to eventually rocking on stage.
This guide is your roadmap, designed to cut through the confusion of online tutorials and conflicting advice. Forget the pressure to choose the perfect method be it university lessons, a personal teacher, or self study via YouTube. Every method is valid if you stick with it.
This article is focused on the essential, non-negotiable foundations that every successful guitarist must master first. What truly matters is choosing the approach that makes you feel comfortable, motivated, and excited to pick up your guitar every day.
How I started my guitar journey: About 12 years ago (in 2013), I bought my first student guitar. I detail the entire process of purchasing your first acoustic guitar in my article, “How to Buy Your First Acoustic Guitar as a Student: The Complete Beginner’s Guide.” What happened next was truly an amazing journey of discovery and dedication.
When I first brought my guitar at home, I started by simply playing rhythms along to songs blasting through my speakers. I had no idea about scales, chords, or proper technique. I just held the guitar and tried to match the music. I’ll be honest, I probably wasted almost one year just relying on this kind of aimless strumming.
However, this year wasn’t a total loss. During that time, I taught myself some crucial basics. Finger exercises, how to hold the guitar, the names of the strings and how to properly tune the instrument/guitar.
I eventually realized that to progress, I needed structured guidance. I decided it was time to seek out a teacher. In a moment of excitement, I found out that an old school classmate of mine was a guitarist! I called him up, and visited him, and he agreed to start teaching me. That was the pivotal moment when I began my proper, structured practice on the guitar.
If I told you I’ve had many teachers over the years, it would be the truth! I have always sought to learn something from everyone I met. I don’t know if this insatiable curiosity is a good or bad thing. But honestly, I’ve learned so much about music from every teacher I’ve had. Each one appreciated my crazy passion for the guitar. In my early days, I would practice intensely 5 to 6 hours a day, and even now, 12 years later, I still dedicate time every single day to practice after finishing my daily work. That level of commitment is what you need, but commitment is useless without direction. Let’s start building your foundation the right way.
- Master Your Posture : Learning How To Hold The Guitar Properly.
The moment you pick up your guitar, the first skill you learn isn’t a note, it’s posture. Think of your posture as the foundation of a house. If the foundation is shaky, the whole structure of your playing technique will eventually fail. It’s the silent foundation that prevents pain and ensures your hands can move with the speed and dexterity required for future shredding.
Before exercises, posture matters:
- How to sit
- How to hold the neck
- How to place right hand for strumming
A. How to Sit (Finding your stable base)
- The Setup Casual Sit (Recommended for Beginners): For the most common and comfortable starting position, Choose a stable chair without armrests for the best support. Keep both feet flat on the floor, roughly shoulder width apart. If you are right handed, place the guitar’s lower, curved bout should rest securely on your right thigh. This positioning keeps the guitar steady and makes it easier to start playing comfortably.
- The Back and Neck: Keep your back straight, but relaxed. One of the most common beginner mistakes is hunching over to see the strings. You should bring the guitar to you, not your head to the guitar.
- The Goal: You want a stable base so the guitar doesn’t shift when you move your hands.
B. How to Hold the Neck (The Fretting Hand)
- The Thumb Placement: For most beginner chords, your thumb should rest naturally at the back center of the neck. This position gives your fingers maximum leverage and reach over the fretboard. Avoid hooking your thumb over the top of the neck initially, as this limits your flexibility.
- The Wrist: Keep your wrist naturally straight, comfortable position. If your wrist is bent too sharply, you’ll feel tension and restrict your movement.
- The Fingers: Use the very tips of your fingers to press down the strings, right behind the metal fret wire. Pressing with the tips ensures each note rings clearly and avoids muting adjacent strings.
C. How to Place Your Right Hand (The Strumming Hand)
- Anchor Point: Let your forearm rest lightly over the curve of the guitar’s body (just below the bridge area). This acts as your anchor and gives your hand a stable pivot for smooth strumming.
- Movement: Strumming should come primarily from the wrist, Keep your elbow relaxed and avoid stiffness. A loose wrist allows for fluid, more natural rhythmic and flow.
- Holding the Pick: Hold the pick firmly, but without tension, between your thumb and the side of your index finger. Let only a small tip of the pick stick out past your grip, just enough to strike the strings cleanly and stay in control.
- Your Foundation for Learning Guitar: Start Smart
A. The Very First Steps (Getting Ready)
Understanding Your Instrument: Start by understanding the basic difference between acoustic and electric guitars. ( I also have separate articles on acoustic and electric guitars, you can check those for detailed information.)
How to Buy Your First Electric Guitar as a Student: The Complete Beginner’s Guide
“How to Buy Your First Acoustic Guitar as a Student”
B. Must Have Accessories: Gather the basics; tuner, strap, picks, capo, guitar bags & cases and for electric guitar amp and cable. (I also have an article on guitar accessories; you can check for detailed information.)
Guitar Accessories You’ll Need to Rock as a Student
C. Guitar Parts: Get familiar with the main sections of the guitar (fretboard, strings, headstock, bridge).
3. Basics You Need to Know
- String Names: Get familiar with the names of all six strings (E-A-D-G-B-e).
- Tuning Your Guitar: Learn how to tune your guitar properly using a tuner or mobile app.
- Fretting Position: Understand where to position your fingers, and how much pressure to apply for clean notes.
4. Start with simple workouts: Building Finger Strength and Dexterity
Once you’ve got the hang of holding your guitar correctly, let’s get those fingers moving and activate your muscles. These aren’t flashy riffs with simple warm ups; they’re the foundation that develops hand coordination and finger agility you’ll use in everything from beginner chords to professional lead guitar work.
- Finger stretching
- 1-2-3-4 chromatic exercise
- Slow alternate picking
A. Finger Stretching and Warm ups
Finger stretching and warm ups just like athletes stretch before exercise, and the guitar requires similar preparation!
- The Purpose: Increase circulation and flexibility in your fingers, wrists, and forearms to avoid tension and injury during practice.
- The Technique: Start with slow, controlled wrist circles. Next, straighten one arm with your palm facing up, and use your opposite hand to carefully pull your fingers back toward you for 10 seconds. Repeat, turning your palm down.
- Safety Note: This should feel like a mild tension, never pain. Stop if it hurts, ease up. A quick warm up is crucial before every practice session.
B. The 1-2-3-4 Chromatic Exercise
The spider walk 1-2-3-4 chromatic training is iconic exercise for beginners. This is your foundation for building independent finger control and playing precision.
- The Goal: To train each of your four fretting fingers (index=1, middle=2, ring=3, pinky=4) so each finger can cleanly fret notes on its own.
The Technique:
- Begin on the lowest pitched string (Low E).
- Fret the 1st fret with your index finger (1) and pick the note.
- Place your Middle Finger (2) on the 2nd fret and pick.
- Press your ring finger (3) on the 3rd fret and pluck.
- Fret the 4th fret with your pinky finger (4) and pick.
- Repeat this entire four-note sequence as you move down the neck to the A,D,G,B and conclude on the high E string.
- Key Technique: Keep your fingers curved and press the string just behind the metal fret wire. Leave your fingers on the fretboard once placed, lifting only when necessary to move across to another string.
C. Alternate Picking Technique
Mastering slow alternate picking is a fundamental technique, this technique teaches you proper pick control for building speed, and more consistent playing.
- The Aim: Build your muscle memory for balanced, smooth picking, even sounding notes using both down picks and up picks with equal strength.
- The Process:
1. Select any open string to practice on.
2. Pick down followed directly by picking up. continue alternating this down up motion in a steady rhythm.
3. Concentrate the picking motion in your wrist joint, minimizing elbow movement.
The Golden Rule: Start Incredibly slow tempo, possibly with a metronome at 60 BPM (beats per minute). Focus on sound clarity rather than fast playing. Your goal is to make each downstroke and upstroke sound identical.
Speaking From Personal Experience: This is exactly how I’ve trained since I picked up the guitar. I can personally vouch for this method. My routine involves practicing at 60 BPM for approximately 2 hours, then gradually moving to 80 BPM. This methodical progression has significantly improved my speed and accuracy in guitar solos, each note comes out clean and clear. Patience at slower tempos build the muscle memory you need for lightning fast playing.
5. Your Gateway to Rhythm Playing: First Basic Chords
You’ve built your proper posture and exercises for finger control, now it’s time to turn those fundamentals into real music. The goal is to learn a few simple chords, open chords that allow you to develop your sense of rhythm.
- The Challenge of the first chord: Why does your first chord sound muted! New players often feel discouraged when their chords sound dull or buzzy. This typically happens when you’re not applying enough pressure or poor finger placement. Remember, patience pays off! Keep practicing your finger placement until each note sounds crisp and clean.
- Your First Two Chords: E minor and C Major chords. These chords are ideal for beginners because they feature simple finger placements, and they appear in countless songs you already know and love.
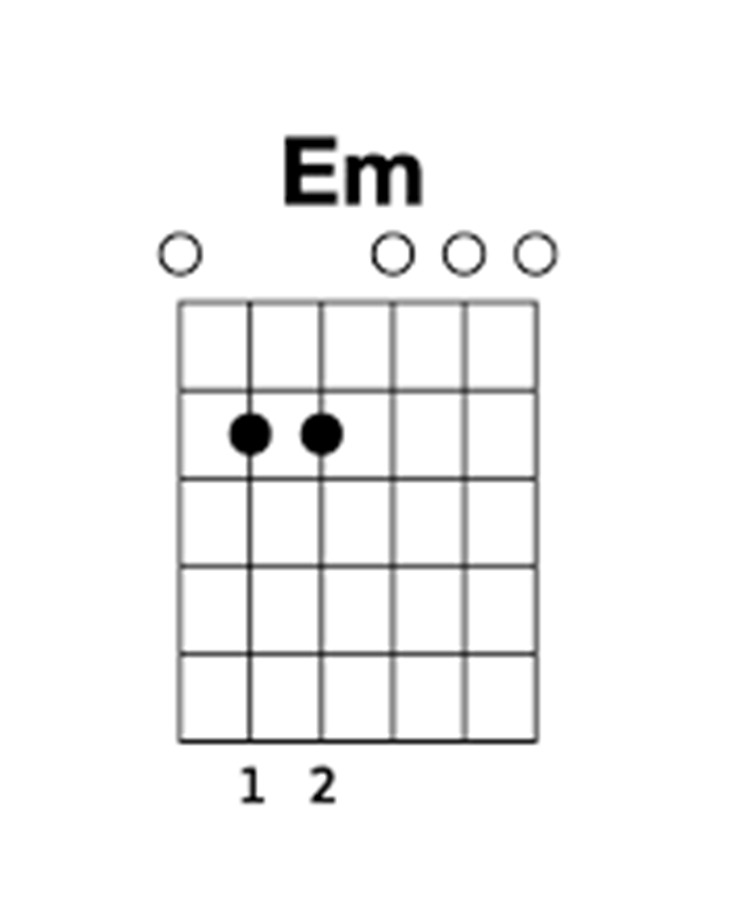
- Learning the E minor chord (Em): This chord is widely regarded as the most beginner friendly option since it uses just two fingers and lets several open strings ring out.
The reason we start here: It establishes proper finger shape and curved hand position without requiring wide finger stretches.
How to finger it:
- Place your Middle Finger on the A string (5th string), 2nd fret.
- Place your Ring Finger on the D string (4th string), 2nd fret.
Strumming technique: Strum down across all six strings. Listen for bright and clean, ringing notes on every string!”
- Learning the C Major chord (C): This chord teaches you to spread your fingers across different frets and appears in many songs.
Why C Major comes next: It challenges your fingers to stretch and
requires proper arching to avoid muting adjacent strings.
How to finger it:
- Place your Index Finger on the B string (2nd string), 1st fret.
- Place your Middle Finger on the D string (4th string), 2nd fret.
- Place Ring Finger on the A string (5th string), 3rd fret.
Strumming technique: Play only the top five strings beginning with the A string. Make sure to avoid the thickest low E string!”
- Practicing Rhythm: The hardest part of rhythm guitar isn’t holding individual chords, it’s moving cleanly and efficiently from one chord to another.
- Strumming Practice: Keep the Em chord fingered and practice strumming four slow, deliberate downstrokes one after another.
- Switching Chords: Practice raising your fingers from Em and smoothly transitioning them into the C Major chord shape.
- The Practice Routine: Switch repeatedly between Em and C with the four stroke rhythm. Focus on cleaner, faster chord changes with minimal dead space where no sound is produced.
The Key Principle: Focus on making smooth, correct transitions rather than rushing. Speed comes automatically after you’ve mastered accuracy.
Why Low Wins the Race: How I Mastered Rhythm Guitar
My own journey began with E minor chord (Em), when I began working on rhythm guitar, I made a conscious decision to focus entirely on consistency and flawless chord transitions. Instead of rushing through multiple chords, I imposed strict discipline on myself. For two solid weeks, I worked on holding Em and maintaining a steady rhythm of four consecutive down strokes. I maintain the exercise, never permitting gaps or rushed moments in my strumming pattern.
Following those foundational two weeks, I gradually added the challenge of switching chords. While keeping my four downstroke rhythm intact, I’d switch to C Major on the fourth stroke,then continue the pattern for another four strokes. I practiced this specific Em to C to Em cycle for one focused hour every day.
After maintaining this routine for one month, the improvement was remarkable. This technique massively boosted my rhythm playing skills and equipped me with the skills to change chords smoothly and accurately.
My strong recommendation for beginners: start slow practice and relentless consistency. Speed arrives naturally once your accuracy and clarity are solidified.